Resource Manager is a powerful tool for lesson planning and development. You can use it to search for or build your own lessons, assignments, and screens.
Resource Manager is divided into three main sections:
- Search and Filter
- Topic Index and Resource Sets
- Resource Folders

Topic Index / Resource Sets #
You can browse the tabs on the left-hand side of the screen. This is a complete library of Quaver content.
The Topic Index shows the major lesson themes or topics throughout QuaverMusic.
You’ll notice the topics are color-coded. The first four sections address the four domains used throughout NCCAS and many state standards. Below these, you’ll find additional topics covering common teaching styles or classroom needs, such as assessments, projects, or specific cross-curricular subjects. For more info on these topics, click here.
The Resource Sets correlate to the Supplemental Resources found on the Teacher Dashboard. This section will show you the resources available in each of these
Search #
Use the center section of Resource Manager to search for specific resources by title or keyword.
Use the Grade and A-Z filters to sort and filter results.

Quick Tip: Click the Home button to clear results. Right-click the Home button to view search history.
To preview search results:
- Select any item from the search results to open a preview window at the bottom of the screen.
- Select Menu > Launch to open the resource in a new window.
- Select Menu > Get Link to generate a shareable a link for your students.

Quick Tip: Click the thumbnail of the image to view it in a larger form.
Grabbing a Resource Link #
Select Menu > Get Link to generate a shareable link for your students.
Link expiration date:
Resource links are tied to your QuaverEd license. If your license expires, any copied QR codes/Links will no longer work.
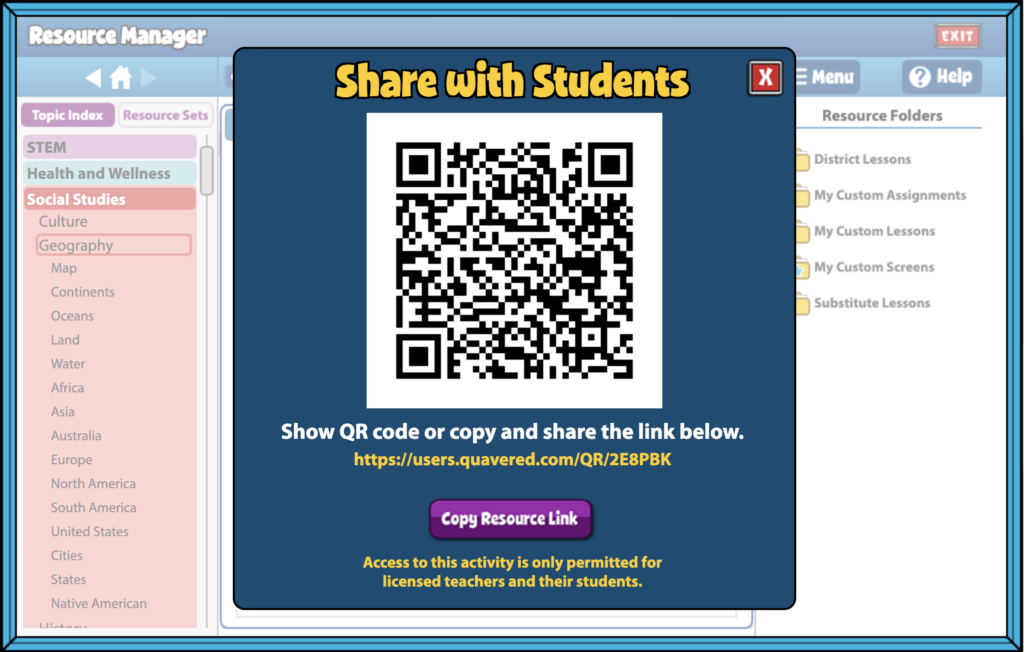
If it takes some time to renew your license, or if there is a break in your license period, your QR codes/links will remain linked to your account once your license is renewed.
Right-click a folder to see a contextual menu with:
- New Folder: Creates a new folder.
- New Lesson: Creates an empty lesson to be customized.
- New Assignment Template: Creates an empty assignment to be customized.
- New Screen: Navigates to Resource Creation to create a new screen. Resources created here will populate in an auto-generated My Custom Screens folder.
- Rename: Renames selected item.
- Cut: Cuts selected item to be pasted in another location.
- Delete: Deletes selected item.

Screens #
Quaver lessons or assignments are made up of screens. Screens contain a variety of lesson materials including musical exercises, games, videos and more! Quaver comes with a huge set of pre-built lessons with screens you can grab from. You can also create custom screens in Resource Creation.
Add screens to a folder
To add a screen to a folder, drag a screen from the search window or pre-existing folder to a new folder, lesson, or assignment. Screens built in Resource Creation will show up in your “My Custom Screens” folder by default. You can move these to other folders as needed.
Once a screen has been added to a folder, right-click it OR select the screen and click MENU to see available options:
- Launch: Opens Screen.
- Get Link: Generates a shareable link for selected screen.
- Edit Screen: Allows you to edit custom screens.
Note: Quaver pre-built screens cannot be edited! - Edit Notes/Video Instructions: Adds/edits written and video instructions on selected screen.
- Cut: Cuts selected item to be pasted in another location.
- Copy: Copies selected item to be pasted in another location.
- Delete: Deletes selected item.

The Icon Legend, shown below, shows the various types of available screens in the Resource Manager.

Lessons #
Lessons are made of a series of Quaver-made or user-made custom screens. Lessons can only be found in your teacher account and are meant to be used in the classroom.

Right-click a lesson OR select a lesson and click MENU to see available options:
- Launch: Opens lesson in Lesson Plan Presenter.
- Edit Lesson: Allows you to edit screens and headers within a lesson.
- Rename: Renames selected item.
- Cut: Cuts selected item to be pasted in another location.
- Copy: Copies selected item to be pasted in another location.
- Delete: Deletes selected item.
- New Screen: Opens Resource Creation to create a new screen.
- Share Lesson: Shares lesson with district colleagues.
- Create Assignment From: Converts lesson into an assignment.
- Lesson Plan: Opens lesson plan for selected lesson.

Right-click an assignment OR select an assignment and click MENU to see available options:
- Launch: Opens assignment.
- Edit Assignment: Allows you to edit screens and headers within an assignment.
- Rename: Renames selected item.
- Cut: Cuts selected item to be pasted in another location.
- Copy: Copies selected item to be pasted in another location.
- Delete: Deletes selected item.
- New Screen: Navigates to Resource Creation to create a new screen.
- Share Assignment: Shares assignment with district colleagues.
- Create Lesson From: Converts assignment into a lesson.
- Assign to Class: Opens Assignment Details screen for assigning to a class.