Quaver Pre-K Lesson Guides are digital lesson plans with ready-to-launch interactive resources.

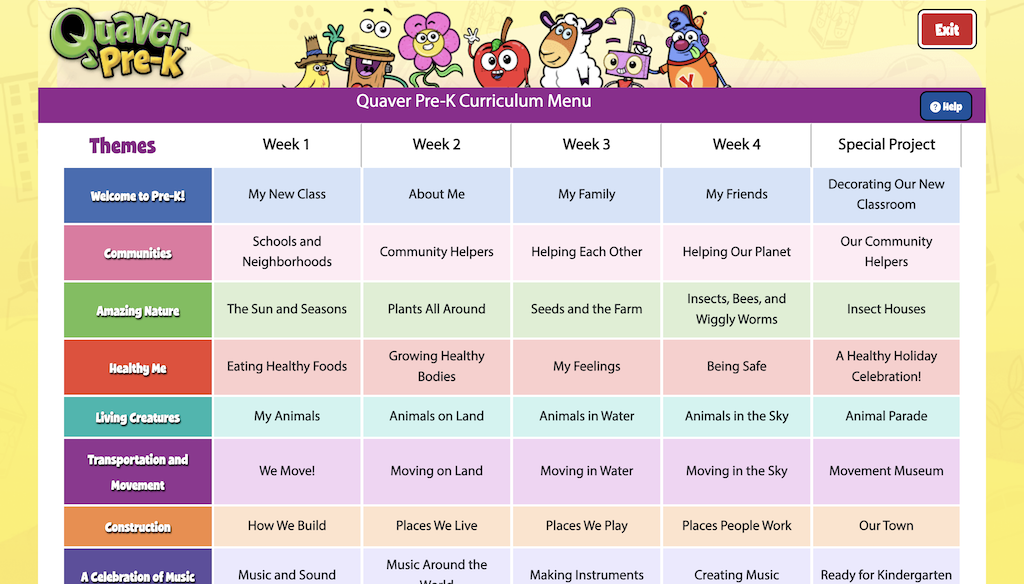
Quaver Pre-K curriculum is divided into monthly and weekly themes. The left side of the menu, the curriculum is broken down into eight themes:
- Welcome to Pre-K
- Communities
- Amazing Nature
- Healthy Me
- Living Creatures
- Transportation and Movement
- Construction
- A Celebration of Music
Across the top of the menu, you’ll see each theme is explored over the course of four weeks with an optional special project that can be used to extend the learning further.

Weekly Sub-Themes #
Click any week or sub-theme title to zoom in further.
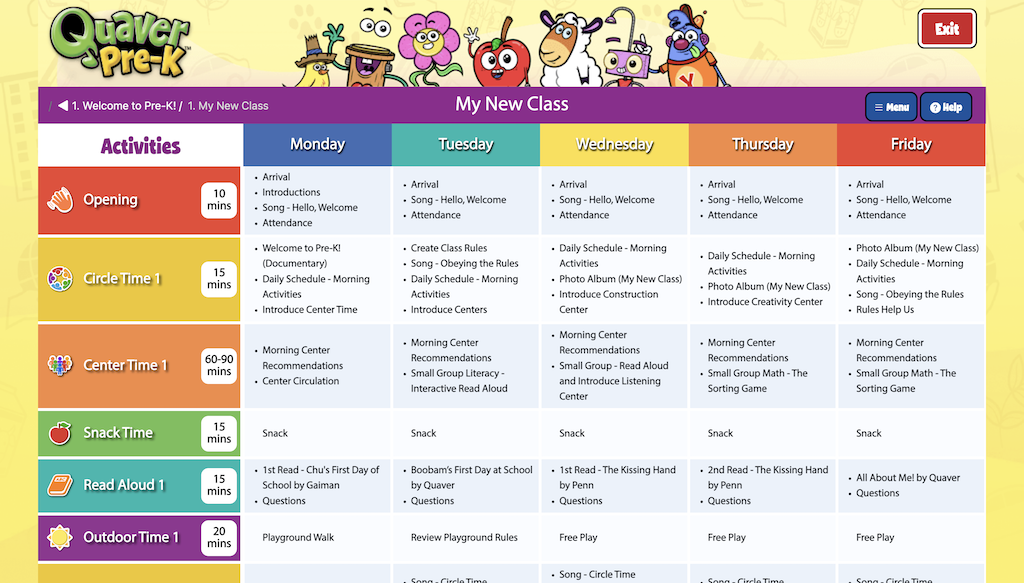
The cells in this view provide a summary of the week’s lessons, broken down by day and activity.
This view of the week is very useful to prompt your teaching throughout the day. It is also available in printed form as a Week-at-a-Glance Handbook under Instructional Guides on the Teacher Dashboard or in your Quaver Pre-K Classroom Kit.

Lesson Overview #
Clicking a day of the week from the top menu will bring you to the day’s Lesson Guide. Everything you need to teach a lesson is here.
Starting at the top, you’ll see the Key Skills, Daily Books, Daily Vocabulary, and Materials that will be used throughout the course of the day.

Lesson Activities #
Scroll down to explore the day as it unfolds, starting with the Opening Activity Section. Notice the large orange bar includes an indicator of the Activity Section and the guidelines for how long this part of the day should last.

Click the bar to collapse this Activity Section and view the rest of the day. Each day follows a consistent sequence of learning through 15 Activity Sections:
- Opening
- Circle Time 1
- Center Time 1
- Snack Time
- Read Aloud 1
- Outdoor Time 1
- Circle Time 2
- Lunch Time
- Read Aloud 2
- Rest Time
- Movement
- Circle Time 3
- Center Time 2
- Outdoor Time 2
- Reflection
Click any Activity Section to view the activities, teaching notes, and resources outline for that part of the day.
Use Menu to Collapse or Expand all Activities in your Executable Lesson Guide.

Teaching Notes #
Teaching notes provide guidance for carrying out each activity in sequence. Bullet points include italicized text that indicates the Texas Prekindergarten Guidelines Breakouts that are met in this step.

Teaching Tips #
Small icons to the right of the teaching notes indicate a Teacher Tip. Click the icon to view suggestions for making the most of this activity with your children.

At the top of your screen, click Help > Icon Legend to see the variety of tips included in each lesson guide.

Interactive Resources #
Many activities will include interactive resources, represented by a visual thumbnail of the activity to the right of the teaching notes.
There are two ways to deliver this content to children on a Child-Facing Display.
- Launch the resource in your browser tab and drag to a second display
- Use a QR Code to open the activity on a mobile device

To Launch an Interactive Resource in Browser
- Click the resource thumbnail to open it in a new tab in your browser.
- Then simply drag the tab to a Child-Facing display.
To Send an Interactive Resource to a Mobile Device
- Click the QR code in the bottom left corner of the resource thumbnail to display a QR Code.
- Scan this QR code with a mobile device to open it in your mobile device browser.
- Use your device settings to lock the device for child use.
Supporting Resources #
Each Activity Section ends with Supporting Resources. These are referenced throughout the teaching notes and often include additional interactive resources that might be useful to extend or differentiate instruction.
Outcome Definitions #
Outcome Definitions are accessible below the Supporting Resources in each Activity Section. Click to view the Outcome referenced in the section along with the full text from the Texas Prekindergarten Guidelines.
Differentiation #
Differentiation strategies are accessible just to the right of Outcome Definitions and offer guidance for engaging all children in the above mentioned activities.
Print Options #
Click MENU for a number of print options:
- View any available worksheets, and print each individually.
- Print the full Executable Lesson Guide by clicking Print All. This will generate a printer-friendly version of the full day, including every tip, outcome, and differentiation strategy.
- Click Print Select to unselect any of these sections to save paper or simplify your printed lesson guide.
Once you click okay, you’ll be taken to your browser’s print window where you can make additional options such as printing on both sides of the page, limiting the print request to only certain pages, or printing multiple copies of the lesson guide.
Lesson Navigation Bar #
To move between screens, click on the previous and next buttons. If you’d like to jump between screens quickly, click on the title bar at the bottom and select the screen you want.
The exit button at the bottom right takes you back to the lesson summary.

Screen Order Editor #

All screens in the lesson are displayed when clicking the title bar. You have the ability to temporarily rearrange the order of screens in a lesson. Click the purple edit icon in the top right corner.
After clicking the edit icon, select a screen and use the yellow arrows to adjust its position. (shown below) Alternatively, you can drag and drop screens to reorder them. Click ‘OK’ when the screens are in your desired order.
Please note that these changes are temporary; once you close the Lesson Presenter window, the screens will return to their original order.

Lesson Menu #
Every lesson screen features a Settings and a Create menu. You can access these menus from the curriculum, Resource Manager, or specific toolboxes like the Teacher Toolbox, and you’ll encounter them in various areas of the curriculum.
At the top of each menu, you’ll notice yellow arrows. Clicking either arrow will simultaneously hide both the Settings and Create menus, as shown in the bottom left image. Clicking the yellow arrow on either side will reopen both menus, as illustrated in the bottom right image.
Closed Menu

Open Menu

Important: The menus automatically adjust to your device’s screen size, appearing on each side of your window or merging into a single menu as needed. For example, a tablet may consolidate the menus, while an interactive whiteboard may display them separately. Both versions are shown below.
You can merge the menus using your browser’s built-in zoom feature. Zooming in will combine them at the bottom of the screen, while zooming out will separate the menus to each side again, depending on your device/browser capabilities.
Separated Menus

Consolidated Menu


